Tag Archive: archlinuxarm


As the Banana Pi has mainline support in both U-boot and the Linux kernel, it should be fairly simple to make it run. ArchLinuxARM does not have u-boot for the Banana Pi compiled, but compiling it myself should be trivial. I am using the gcc cross compiler binaries provided by ArchLinuxARM. ( https://archlinuxarm.org/wiki/Distcc_Cross-Compiling )

The process to compile U-boot is explained at the sunxi website. When using the cross compiler from the ArchLinuxARM website, be sure to add it to the path. Furthermore, CROSS_COMPILE=arm-unknown-linux-gnueabihf- should be used. This is the thing that differs from most guides, which use a different cross compiler. After compiling, use the guide for the CubieBoard 2, and replace the u-boot-sunxi-with-spl.bin file with the file we compiled ourselves.

But it is still not working! The bootloader cannot find the kernel and is attempting netboot. When investivating I’ve found the following:

=> ext4ls mmc 0:1 /boot
<DIR>          0 .
<DIR>       4096 ..
=> ext4ls mmc 0:1 /etc
<DIR>       4096 .
<DIR>       4096 ..
            4096 zImage
<DIR>       4096 dtbs
               0 boot.scr

The bootloader has trouble reading the ext4 file system. When looking at the SD card from my laptop, everything looks fine

[root@8570w bananapi]# ls mnt/boot
boot.scr  dtbs	zImage

So… what is wrong? It seems there are file system features enabled that are not supported by U-boot, and that U-boot is not checking feature flags to detect this. When I realised this was the probable problem, I was able to verify this conclusion by a quick search. Therefore, the guide for the CubieBoard 2 should have one additional thing altered.

mkfs.ext4 -O ^metadata_csum,^64bit /dev/mmcblk0p2

With these alterations, running a mainline u-boot and kernel works fine. Nevertheless, the mainline kernel has no video acceleration support yet. As I was thinking to replace my Raspberry Pi (first generation Mobel B, the 256 MB RAM model) by the BananaPi, I might try running an AllWinner/sunxi kernel. But getting those compiled…. is yet another struggle. That’s why I prefer mainline support. If the code is in the main repository, the code is clean, and it will compile fine, but the code released by AllWinner is basically a mess. I suppose it’s easier to extract a kernel from an image then compiling it myself.

I must say, the quality of the composite output on the Banana Pi looks better then the output generated by the Raspberry Pi. I’ve only been looking at the console and an X session (with only xterm running)

My server Pi, well… it still needs some server stuff to be installed. Installing git has been forever on my TODO list. One of the things that are supposed to be handles by this git server is nightly backups of my dedicated server, which hosts this blog among a number of other sites. Originally, my BeagleBoard was supposed to have this role, but due its instabilities, I have never set it us as a git server. At some point in time, Eileen wanted to set up a server at her place, and asked me to help her with configuring it. So I asked if I could have some space on that server for backup purposes. Unfortunately, that machine was unstable as well, so it shut down as well.

To manage git, we’re going to use gitosis. The very same way as is done on my dedicated server (at ovh). But we’re going to use a different configuration. The ovh server exports all repositories, while here we’re going to set up private repositories. But we also want to have the possibility to have public repositories. We will also configure gitweb to have a nice interface to those public repositories.

This configuration is performed on a Raspberry Pi running ArchLinuxARM. However, this guide could be applied to regular ArchLinux on i386 or x86_64 as well.

Let’s get started, shall we?

[andre@rpi-server ~]$ yaourt -S gitosis-git

We have to create set the home directory for the git user manually:

[root@rpi-server home]# mkdir /srv/gitosis
[root@rpi-server home]# usermod -d /srv/gitosis/ git

Since we’re hosting this on a raspberry pi, and don’t want to store the repository on the SD Card, we’re going to apply the same method as we’re dong during the setup of the NFS shares: We add the following line to our fstab

/home/gitosis   /srv/gitosis    none    bind    0   0

Which basically means we mount the /home/gitosis directory to /srv/gitosis. Of course we could simple have made a symlink as well. Anyhow, let’s continue.
***** TODO **** use a symlink after all???

[root@rpi-server home]# mkdir /srv/gitosis
[root@rpi-server home]# mkdir /user/gitosis
[root@rpi-server home]# mkdir /srv/gitosis
[root@rpi-server home]# chown git:git /srv/gitosis
[root@rpi-server home]# chown git:git /home/gitosis/
[root@rpi-server home]# mount /srv/gitosis

Now, I am going to initialise gitosis. I will do this as the git user. So, I su to root and then to git, like this:

[andre@hplaptop ~]$ su
Wachtwoord: 
[root@hplaptop andre]# su git
[git@hplaptop andre]$ cd
[git@hplaptop /]$ 

I have placed a file in the home folder containing my public key. I will try to initialise gitosis using this key:

[git@rpi-server gitosis]$ gitosis-init < andre\@hp.pub 
fatal: unable to access '/home/andre/.config/git/config': Permission denied
Traceback (most recent call last):
  File "/usr/bin/gitosis-init", line 9, in 
    load_entry_point('gitosis==0.2', 'console_scripts', 'gitosis-init')()
  File "/usr/lib/python2.7/site-packages/gitosis/app.py", line 24, in run
    return app.main()
  File "/usr/lib/python2.7/site-packages/gitosis/app.py", line 38, in main
    self.handle_args(parser, cfg, options, args)
  File "/usr/lib/python2.7/site-packages/gitosis/init.py", line 136, in handle_args
    user=user,
  File "/usr/lib/python2.7/site-packages/gitosis/init.py", line 75, in init_admin_repository
    template=resource_filename('gitosis.templates', 'admin')
  File "/usr/lib/python2.7/site-packages/gitosis/repository.py", line 54, in init
    raise GitInitError('exit status %d' % returncode)
gitosis.repository.GitInitError: exit status 128

Apparently, it tries to access file in my (andre) home directory, while its running as git. It shouldn’t know about me, right? Well….

[git@rpi-server gitosis]$ set | grep andre
MAIL=/var/mail/andre
XDG_CACHE_HOME=/home/andre/.cache
XDG_CONFIG_HOME=/home/andre/.config
XDG_DATA_HOME=/home/andre/.local/share

So, there is still a reference to my config directory in the enviorement, lets unset this shit and continue:

[git@rpi-server gitosis]$ unset XDG_CACHE_HOME
[git@rpi-server gitosis]$ unset XDG_CONFIG_HOME
[git@rpi-server gitosis]$ unset XDG_DATA_HOME

Now, we can initialise gitosis:

[git@rpi-server gitosis]$ gitosis-init < andre\@hp.pub 
Initialized empty Git repository in /srv/gitosis/repositories/gitosis-admin.git/
Reinitialized existing Git repository in /srv/gitosis/repositories/gitosis-admin.git/

Now, we're going to install and configure the web server:

[andre@rpi-server ~]$ yaourt -S apache

We're going to do the mount bind again

/home/http   /srv/http    none    bind    0   0
[root@rpi-server ~]# mkdir /home/http
[root@rpi-server ~]# mount /srv/http/
[root@rpi-server ~]# chown http:http /srv/http/
[root@rpi-server ~]# chmod g+w /srv/http/

I'm going to add myself to the http group.

[root@rpi-server http]# groupmems -a andre -g http

As I've mentioned before, I wish to host gitweb as well. Gitweb is in the git package, so it's already installed, just making a symlink is enough, which I can do as myself, as I am in the group http. I've also downloaded the "unknown" folder from my ovh server, which is the page that displays the "domain not served as this server" page in case an unknown vhost is requested. I will move this as well:

[andre@rpi-server ~]$ ln -s /usr/share/gitweb /srv/http/gitweb
[andre@rpi-server ~]$ mv unknown /srv/http

As the fact I am putting my "unknown vhost" page on this server, it will be supporting vhosts. If a requested domain doesn't match any VirtualHost in the apache config file, it will serve the first entry in the config file, therefore we will edit the config file /etc/httpd/conf/extra/httpd-vhosts.conf and put the following in

NameVirtualHost *:80

<VirtualHost *:80>
    DocumentRoot "/srv/http/unknown"
    ErrorLog "/var/log/httpd/unknown-error_log"
    CustomLog "/var/log/httpd/unknown-access_log" combined
</VirtualHost>

However, Virtual Hosts aren't enabled yet. We need to edit the main config file in order to include the vhosts config file. We need to open /etc/httpd/conf/httpd.conf and uncomment the virtual hosts line:

# Virtual hosts
Include conf/extra/httpd-vhosts.conf

The "unkown vhost" page is written in php, so we're also going to install php:

[andre@rpi-server ~]$ yaourt -S php-apache 

And add it to the apache main configuration file again: we need to load the library, and include the configuration file:

LoadModule php5_module modules/libphp5.so
Include conf/extra/php5_module.conf

We also have to add something for the gitweb configuration to the config file

<Directory "/srv/http/gitweb">
   DirectoryIndex gitweb.cgi
   Allow from all
   AllowOverride all
   Order allow,deny
   Options ExecCGI
   <Files gitweb.cgi>
   SetHandler cgi-script
   </Files>
   SetEnv  GITWEB_CONFIG  /etc/conf.d/gitweb.conf
</Directory>

To finish the configuration, we're going to add an actual virtual host to the config, which also serves the gitweb. So we're going to edit the vhosts config again:

<VirtualHost *:80>
    ServerName ehv.blaatschaap.be
    Alias /gitweb "/srv/http/gitweb" 
    DocumentRoot /srv/http/blaatschaap.be/ehv
    ErrorLog "/var/log/httpd/blaatschaap.be-ehv-error_log"
    CustomLog "/var/log/httpd/blaatschaap.be-ehv-access_log" combined
    <Directory /var/www/gitweb>
       Options ExecCGI +FollowSymLinks +SymLinksIfOwnerMatch
       AllowOverride All
       order allow,deny
       Allow from all
       AddHandler cgi-script cgi
       DirectoryIndex gitweb.cgi
   </Directory>
</VirtualHost>

Now, this part of the server is configured. What still has to be done is putting the backup repository so far on the Pi server, and adjusting the script on the ovh server to make backups to this server.

Also, pretty soon I will be getting a new OVH server, as they're offering much better specs for the same price, and I am going to convert to Debian for a server. ArchLinux is great for desktops, but the changed in a rolling distribution such as ArchLinux are not convinient for a machine that's supposed to be always up. Especially the transition from sysvinit to systemd is giving me a headache, as sysvinitscripts are no longer supported... and I am a bit uncomfortable about chaging stuff in the boot loader as I don't have any serial console or anything. If it reboots, I just have to wait till it comes up, if it doesn't.... bad luck.

Besides, I am hosting a few sites for third parties. In order to keep overview, and offer my users a convenient interface I am considering usingISPconfig on my new server. As I have paid for the current server till 15 April, I should have finished the transition by then. I have paid till April since I have renewed my contract just one day before the VAT was increased from 19% to 21%. Anyhow. I plan to order the new server in February, so I have plenty of time for testing.

Let’s go straight on to installing ArchLinuxARM on the CubieBoard. Currently I am using my phone’s 8 GB µSD card. I have bought a new 16 GB µSD card for use with the CubieBoard, so I can put the 8GB one back into my phone, and be able to listen some music while being away from home.

Creating a bootable media is straight forwards. There is a script that does all the work. The boot process is similar as I have described for the BeagleBoard, there is a pre-boot loader (sunxi-spl.bin) which loads the boot loader (u-boot.bin).

Let’s begin, shall we?
Download https://raw.github.com/linux-sunxi/sunxi-bsp/master/scripts/sunxi-media-create.sh
Download http://dl.linux-sunxi.org/amery/sunxi-3.0/latest/cubieboard_hwpack.tar.xz
Download http://archlinuxarm.org/os/ArchLinuxARM-sun4i-latest.tar.gz

As with the BeagleBoard guide, I am linking to the latest versions above. Things might change. This guide is based on the versions stated below:
http://os.archlinuxarm.org/os/sun4i/ArchLinuxARM-2012.08-sun4i-roofs.tar.gz
http://dl.linux-sunxi.org/amery/sunxi-3.0/20130114-2310/cubieboard_hwpack.tar.xz

Please note: the script required sudo to be installed. I am not fond of sudo, and usually don’t have it installed. I don’t like the idea my user password grating root rights. I prefer that root rights require a different password, therefore I use su to gain root rights on my systems. So, don’t forget to install sudo if you don’t have it, or modify the script.

Update: On a CubieForums thread, someone had a problem with the script and suggests a patch. For me the script worked fine, but if you’re having problems with the script, take a look at this post

[andre@hplaptop cubieboard]$ ./sunxi-media-create.sh /dev/mmcblk0 cubieboard_hwpack.tar.xz ArchLinuxARM-sun4i-latest.tar.gz 

===
=== Partitioning /dev/mmcblk0 ===
===
[sudo] password for andre: 
1+0 records gelezen
1+0 records geschreven
1048576 bytes (1,0 MB) gekopieerd, 0,206529 s, 5,1 MB/s
Even controleren of iemand deze schijf nu gebruikt...
OK

Schijf /dev/mmcblk0: 476416 cilinders, 4 koppen, 16 sectoren/spoor
sfdisk: /dev/mmcblk0: onbekend partitietabeltype

Oude situatie:
sfdisk: Geen partities gevonden.

Nieuwe situatie:
Eenheden: sectoren van 512 bytes, tellend vanaf 0

 Apparaat Opst    Begin     Einde  #sectoren  ID  Systeem
/dev/mmcblk0p1          2048    133119     131072   c  W95 FAT32 (LBA)
/dev/mmcblk0p2        133120  30490623   30357504  83  Linux
/dev/mmcblk0p3             0         -          0   0  leeg
/dev/mmcblk0p4             0         -          0   0  leeg
Waarschuwing: er is geen primaire partitie gemarkeerd als opstartbaar.
Voor LILO maakt dit niets uit, maar DOS MBR zal niet van deze schijf opstarten.
De nieuwe partitietabel is met succes weggeschreven.

Herinlezen van partitietabel...

Als u een DOS-partitie gemaakt of gewijzigd hebt, bijvoorbeeld /dev/foo7,
gebruik dan dd(1) om de eerste 512 bytes nul te maken:
  dd if=/dev/zero of=/dev/foo7 bs=512 count=1  (zie man fdisk(8))

===
=== Format Partition 1 to VFAT ===
===
mkfs.vfat 3.0.13 (30 Jun 2012)

===
=== Format Partition 2 to EXT4 ===
===
mke2fs 1.42.6 (21-Sep-2012)
Verwerpen van blokken: voltooid                        
Bestandssysteemlabel=
Soort besturingssysteem: Linux
Blokgrootte=4096 (log=2)
Fragmentgrootte=4096 (log=2)
'stride'=0 blokken, 'stripe'-breedte=0 blokken
950272 inodes, 3794688 blokken
189734 blokken (5.00%) gereserveerd voor systeembeheer
Eerste gegevensblok=0
Maximum aantal bestandssysteemblokken=3888119808
116 blokgroepen
32768 blokken per groep, 32768 fragmenten per groep
8192 inodes per groep
Superblokreservekopieën opgeslagen in blokken: 
	32768, 98304, 163840, 229376, 294912, 819200, 884736, 1605632, 2654208

Reserveren van groepstabellen: voltooid                        
Schrijven van inodetabellen: voltooid                        
Aanmaken van journal (32768 blokken): voltooid
Schrijven van superblokken en bestandssysteem-metagegevens: voltooid


===
=== Extracting HW Pack ===
===

===
=== Extracting RootFS ===
===

===
=== Copy U-Boot/SPL to SD Card ===
===
20+0 records gelezen
20+0 records geschreven
20480 bytes (20 kB) gekopieerd, 0,0171501 s, 1,2 MB/s
169+1 records gelezen
169+1 records geschreven
173412 bytes (173 kB) gekopieerd, 0,0428142 s, 4,1 MB/s
Copy VFAT partition files to SD Card

===
=== Copy rootfs partition files to SD Card ===
===
Standard rootfs

===
=== Copy hwpack rootfs files ===
===
Done.

We are using a hwpack from linux-sunxi.org. Linux-sunxi.org works on Linux support for Allwinner SoCs. This is still under active development. Therefore we aren’t using an Arch kernel. The Arch kernel fon sunxi just panics when trying to boot it on the CubieBoard. The script installs the kernel and kernel modules on the µSD card. I don’t really like the idea of having files in my file system the package manager isn’t aware of. I might have a look at creating a package for those files.

Anyhow, there are differences between various Linux distros. The µSD card as produced by the script won’t work completely for ArchLinux. Now, the sudo-using script is done, give me real root, and let’s rock on! In the hwpack, there is a file /etc/modules, in which modules to be loaded at boot time are listed. However, on ArchLinux, modules to be loaded during boot are stored at /etc/modules-load.d/*.conf. Therefore we execure the following commands:

[root@hplaptop cubieboard]# mount /dev/mmcblk0p2 /mnt/b
[root@hplaptop cubieboard]# cd /mnt/b/etc
[root@hplaptop etc]# mv modules modules-load.d/cubieboard.conf

Apart from the way to specify the modules to be loaded during boot, another difference is the location of modules. The hwpack still uses, what ArchLinux used to do, /lib/modules, however, nowadays the location should be /usr/lib/modules

[root@hplaptop etc]# cd /mnt/b/lib/modules/
[root@hplaptop modules]# mv * /mnt/b/usr/lib/modules
[root@hplaptop modules]# cd ..
[root@hplaptop lib]# rmdir modules

Update: Also, the other libraries will have to be moved to /usr/lib, otherwise the system will not be able to upgrade afterwards. This is what happens when you put files in your file system the package manager is not aware of. I need to package those files!

Update: The libraries seem to be available in an AUR package mali400, therefore they may be removed at this stage and installed later. Just to be safe, keep a copy of them. Also note, to compile xf86-video-mali you need the headers for libump, which is not in the mentioned mali400 package. I am still investigating this, but I should write about X configuration soon. However, I got a lot of things I am working on. As always, no promises.

[root@hplaptop b]# mv lib/framebuffer/ usr/lib/
[root@hplaptop b]# mv lib/x11 usr/lib/
[root@hplaptop b]# mv lib/libvecore.so usr/lib/
[root@hplaptop b]# mv lib/libMali.so usr/lib
[root@hplaptop b]# mv lib/libUMP.so usr/lib

In theory, we’re ready to boot now. However, there are a few more adjustment I would like to make before actually booting. One of the things about the CubieBoard is, it doesn’t have a MAC address burned in its EEPROM. Therefore it will have a random MAC address every time it boots. This is undesirable, therefore I will have to fix a MAC address. As explained on http://linux-sunxi.org/EMAC, we can configure the MAC address in the the script.bin file, a configuration file that holds information about the board. In order to manipulate the files, we need the tools bin2fex and fex2bin. We can find those tools in the AUR repository, package sunxi-tools-git.

The fex file is a human-readable version of the configuration file. First we decode the binary configuration file to a fex file, and we create backups of both the binary and text versions.


[root@hplaptop ~]# mount /dev/mmcblk0p1 /mnt/a
[root@hplaptop ~]# cd /mnt/a
[root@hplaptop a]# cp script.bin script.bin.bak
[root@hplaptop a]# bin2fex script.bin script.fex
fexc-bin: script.bin: version: 0.1.2
fexc-bin: script.bin: size: 43216 (76 sections)
[root@hplaptop a]# cp script.fex script.fex.bak

Now, I will edit the script.fex file and add a MAC address. I am using one of the MAC addresses it dynamically configured before I was using my own script.bin file. PLEASE NOTE: DO NOT USE MAC ADDRESS BELOW! MAC ADDRESSES ARE SUPPOSED TO BE UNIQUE


[dynamic]
MAC = "8a413f5bf892"

Convert the fex file back to its binary equivalent:


[root@hplaptop a]# vim script.fex
[root@hplaptop a]# fex2bin script.fex script.bin

So far so good, now we’ve fixed the MAC address, I can configure my “DHCP server” (inside the Fritz!BOX) to give it a static IP address, so I can always SSH into the box from my LAN. It’s really annoying when you never know what IP address the box will have.

But, I would also like to connect a monitor to my CubieBoard. What I wrote about this last December is already outdated. Like I said, the Linux kernel for this board is under active development, and stuff that didn’t work yet in December, may work in January. Back in December I wrote, configuration of the resolution goes through the script.bin file, which I’ve just mentioned. However, according to the fex guide, in hdmi mode, I can only specify “tv” resolutions, but my monitor got 1280×1024. The current kernel however, is able to parse the EDID and select the correct resolution, just like the Raspberry Pi does. However, on the CubieBoard it didn’t work quite well. I will investigate this later, but for now, another new feature is the possibility to specify a resolution as a kernel parameter. This is what I am using now to boot up my CubieBoard. The parameters are explained on a Google Groups post about a Fedora release for Allwinner based devices.

According to the parameters explained in that post, I would need to use disp.screen0_output_type=3 disp.screen0_output_mode=1280x1024p60
Put the following in uEnv.txt on the FAT partition


boot_mmc=fatload mmc 0 0x43000000 ${fexfile}; fatload mmc 0 0x48000000 ${kernel}; bootm 0x48000000
extraargs=rootwait disp.screen0_output_type=3 disp.screen0_output_mode=1280x1024p60
fexfile=script.bin

Well… I suppose this is it for now. I am not discussing configuration of the system for the BeagleBoard and CubieBoard now. That’s not board specific, and I have thoroughly discussed this for my Raspberry Pi. A thing I might be discussing in the future is how to configure hardware video acceleration for both BeagleBoard and CubieBoard. However, I will have to investigate this first, so no promises.

Regarding the hdmi/dvi output: It is not working perfectly, as I have to specify the resolution as a kernel parameter. Moreover, when my monitor is directly connected over a hdmi->dvi cable, the monitor complains I should configure a resolution of 1280×1024@60Hz. It thinks I am giving it 1282×1026@60Hz. So, in both directions two pixels too much, and it displays those as a row/column of purple pixels at the left and bottom of the screen. However, when I use my HDMI->VGA adaptor, the screen happily accept the signal as 1280×1024@60Hz.

I will investigate the display issues later, including what the kernel thinks about my EDID. I will also look at how it behaves with the HDMI->VGA adaptor without extra resolution hints in the uEnv.txt, and also connect a CRT monitor, as those are usually a little more flexible in supported frequencies.

The fact I have a working output at the desired resolution now makes my project to hook up a VGA connector to the CubieBoard get a lower priority. However, I intend to still investigate this, as this information is of interest to the CubieBoard community. Besides, yesterday I found the 2mm dupoint cables in my mailbox, so I am finally able to connect something to the CubieBoard I/O pins. Well… that’s a disadvantage of the CubieBoard. All I/O pins are 2mm, for which the cables are not so common.

Edit: One more after-boot comment
After upgrading packages ( # pacman -Syu ) open the uEnv.txt file on the FAT partition and add init=/usr/lib/systemd/systemd to enable systemd, otherwise you will still be using the old rc.conf initscripts.

I know, I have written about this before, but, here it is again. Installing ArchLinuxARM on the BeagleBoard, this time, taking a fresh SD card, and now it works like a sunshine. Yesterday, on the 8 GB card, I’d done exactly the same, without any result.

So, let’s see how to install the January 2013 ArchLinux OMAP3 rootfs to an SD card for use with a BeagleBoard.

Download the bootloader http://archlinuxarm.org/os/omap/BeagleBoard-bootloader.tar.gz
Download the rootfs http://archlinuxarm.org/os/ArchLinuxARM-omap-smp-latest.tar.gz

This says the latest rootfs, which would usually be the right thing to do. But to ensure you’re using the same rootfs as I do, you can use http://os.archlinuxarm.org/os/omap/ArchLinuxARM-2013.01-omap-smp-rootfs.tar.gz in stead.

extract the bootloader tarball. This tarball contains a mkcard.sh script which will partition the card for you. As I’ve had problems with the instructions on the ArchLinuxARM site last time, I will use this script instead, as it worked perfectly.


[root@hplaptop bootloader]# ./mkcard.sh /dev/mmcblk0
1024+0 records in
1024+0 records out
1048576 bytes (1.0 MB) copied, 1.13529 s, 924 kB/s
DISK SIZE - 16130244608 bytes
CYLINDERS - 1961
Checking that no-one is using this disk right now ...
OK

Disk /dev/mmcblk0: 1961 cylinders, 255 heads, 63 sectors/track
sfdisk: /dev/mmcblk0: unrecognized partition table type

Please note it also says

./mkcard.sh: line 37: kpartx: command not found

But this ain’t a fatal error. It seems this is a tool to re-read the partition table and create device maps. However, it seems it works without on my system. Anyhow, let’s continue. The said script only partitions the SD card and creates file systems, but nothing else. (unlike the script for the CubieBoard, which I will discuss later)


[root@hplaptop bootloader]# mount /dev/mmcblk0p1 /mnt/a
[root@hplaptop bootloader]# cp MLO /mnt/a
[root@hplaptop bootloader]# cp u-boot.bin /mnt/a
[root@hplaptop bootloader]# cp uEnv.txt /mnt/a
[root@hplaptop bootloader]# mount /dev/mmcblk0p2 /mnt/b
[root@hplaptop bootloader]# cd /mnt/b
[root@hplaptop b]# tar -xvf /run/media/andre/DataBlaat/arm/beagleboard/archlinux/ArchLinuxARM-omap-smp-20130118.tar.gz

It is important for the BeagleBoard that you copy the MLO file first to the FAT parition. This is a pre-boot-loader, “X-loader”, which will load the bootloader “U-Boot”. Then copy the other files to the FAT partition, “u-boot.bin”, the bootloader, and “uEnv.txt”, a configuration file.

Next extract the root file system to the ext3 parition. I usually include the v to the tar arguments to see what’s going on. When this is done, copy the kernel over to the FAT partition

[root@hplaptop b]# cp boot/uImage /mnt/a

This can take longer then expected. When this is done, create a boot script. This boot script will be like the one on the ArchLinuxARM site, but the mmc init line needs to be ommited. It was needed for ancient versions of U-Boot, but has been obsolete for quite a while. So, the boot script will look like


setenv bootargs 'console=ttyO2,115200n8 root=/dev/mmcblk0p2 rw rootfstype=ext3 rootwait'
fatload mmc 0 0x80300000 uImage
bootm 0x80300000
boot

write this bootscript to bootscr, and run mkimage to convert it to an U-boot script. Even though the current version supports the uEnv.txt file, I didn’t manage to get it to boot using the uEnv.txt only. I kept attemption to boot from NAND, but I want to boot from the SD card. I probably only have to set a certain variable to tell it to boot from SD in stead. However, with the boot.scr file present, it boots fine from the SD card.


[root@hplaptop b]# cd /mnt/a
[root@hplaptop a]# vim bootcmd
[root@hplaptop a]# mkimage -A arm -O linux -T script -C none -a 0 -e 0 -n "Beagleboard boot script" -d bootcmd boot.scr
Image Name: Beagleboard boot script
Created: Fri Jan 25 11:05:47 2013
Image Type: ARM Linux Script (uncompressed)
Data Size: 151 Bytes = 0.15 kB = 0.00 MB
Load Address: 00000000
Entry Point: 00000000
Contents:
Image 0: 143 Bytes = 0.14 kB = 0.00 MB
[root@hplaptop mnt]# cd ..
[root@hplaptop mnt]# umount a
[root@hplaptop mnt]# umount b
[root@hplaptop mnt]# sync

Please note: If you’re missing mkimage is available in the AUR repository as package “uboot-mkimage”. Last time when I made an BeagleBoard SD card, I compiled it from source. After this is all done, unmount the file systems, flush the caches, and just put the card into the BeagleBoard, connect to the serial console, and plug in the power. It boots up fine.

P.S. In the rootfs there are some boot.scr files, but they won’t work. First of all, they appear to be for the TrimSlice. But that’s not the problem. They appear to be configured to load the kernel from the rootfs. In the directory /boot there is uImage, so, perfectly fine. However, U-Boot only supports ext2 and not ext3, therefore these files won’t work.

We might need to adjust the kernel parameters later if we want to set something like hdmi or svideo to work. As stated before, when specifying 1280×1024@60Hz, the BeagleBoard is only capable to deliver 57Hz, which my Compaq 1720 monitor refuses to accept. As I have found out with some CubieBoard tests, which I will write about later, the monitor might be a little more tolerant when the input is analogue. Therefore I tried the mentioned HDMI->VGA adaptor also on the BeagleBoard.

When I had my old BeagleBoard installation running, I experienced lots of USB problems, mostly related to the USB Ethernet adaptor. Lots of errors in the pegasus driver. So, I wonder, are the problems really hardware or are they caused by a crappy driver. Anyhow, I’ve bought an SPI Ethernet adaptor for testing purposes.

Just a few things left do configure on my server Pi. One of them is setting up the scanner server. This is quite straight forwards, and it just takes a couple of minutes to set it up. (See ArchLinux wiki) The first step is to install sane and xinetd on the server:

[andre@rpi-server ~]$ yaourt -S sane xinetd

The next step is setting the allowed clients in /etc/sane.d/saned.conf


# required
localhost
# allow local subnet
192.168.178.0/24

And configuring xinetd. The file /etc/xinetd.d/sane already exists, and all that needs to be changed is setting disable to no. On the clients, add the ip address of the server to /etc/sane.d/net.conf and it just works! Awesome!

Another thing still on the TODO list is the IPv6 tunnel. Unfortunately, the ArchLinux wiki still only lists a configuration for the classical initscripts, and not for systemd. Twice, even: IPv6 – Tunnel Broker Setup and IPv6 – 6in4 Tunnel are describing the same thing.

So.. I guess let’s have a closer look at systemd, how to add custom services to it, right? So… there is a link to Systemd/Services which actually provides what I am looking for. No need to write a custom script. Just adjust it to the settings for the XS4ALL tunnel.

/etc/systemd/system/xs4all-ipv6.service


[Unit]
Description=XS4ALL IPv6 tunnel
After=network.target

[Service]
Type=oneshot
RemainAfterExit=yes
ExecStart=/sbin/ip tunnel add xs4all-ipv6 mode sit remote 194.109.5.241 local 83.160.145.152 ttl 255
ExecStart=/sbin/ip link set xs4all-ipv6 up mtu 1472
ExecStart=/sbin/ip addr add 2001:888:10:590::2/64 dev xs4all-ipv6
ExecStart=/sbin/ip -6 route add ::/0 dev xs4all-ipv6
ExecStop=/sbin/ip -6 route del ::/0 dev xs4all-ipv6
ExecStop=/sbin/ip link set xs4all-ipv6 down
ExecStop=/sbin/ip tunnel del xs4all-ipv6

[Install]
WantedBy=multi-user.target

So… let’s try it:


[root@rpi-server system]# systemctl start xs4all-ipv6
Job for xs4all-ipv6.service failed. See 'systemctl status xs4all-ipv6.service' and 'journalctl -xn' for details.
[root@rpi-server system]# systemctl status xs4all-ipv6.service
xs4all-ipv6.service - XS4ALL IPv6 tunnel
Loaded: loaded (/usr/lib/systemd/system/xs4all-ipv6.service; disabled)
Active: failed (Result: exit-code) since Thu, 2013-01-03 14:50:02 GMT; 8s ago
Process: 15926 ExecStart=/sbin/ip tunnel add xs4all-ipv6 mode sit remote 194.109.5.241 local 83.160.145.152 ttl 255 (code=exited, status=1/FAILURE)
CGroup: name=systemd:/system/xs4all-ipv6.service

[root@rpi-server system]# /sbin/ip tunnel add xs4all-ipv6 mode sit remote 194.109.5.241 local 83.160.145.152 ttl 255
add tunnel sit0 failed: No such device

No worky yet… there is no sit0 device. Sounds like a missing kernel module to me, which makes sense, as I did a full system upgrade ( pacman -Syu) yesterday, which included a new firmware and kernel, but I didn’t reboot yet. So… I think that’s the problem. And indeed it was, after reboot it doesn’t display the error message anymore. However, it doesn’t work yet.

[root@rpi-server andre]# systemctl start xs4all-ipv6
[root@rpi-server andre]# ifconfig
eth0: flags=4163 mtu 1500
inet 192.168.178.49 netmask 255.255.255.0 broadcast 192.168.178.255
inet6 fe80::ba27:ebff:fe89:f248 prefixlen 64 scopeid 0x20 ether b8:27:eb:89:f2:48 txqueuelen 1000 (Ethernet)
RX packets 1614 bytes 167190 (163.2 KiB)
RX errors 0 dropped 0 overruns 0 frame 0
TX packets 1464 bytes 217606 (212.5 KiB)
TX errors 0 dropped 0 overruns 0 carrier 0 collisions 0

lo: flags=73 mtu 16436
inet 127.0.0.1 netmask 255.0.0.0
inet6 ::1 prefixlen 128 scopeid 0x10
loop txqueuelen 0 (Local Loopback)
RX packets 8 bytes 560 (560.0 B)
RX errors 0 dropped 0 overruns 0 frame 0
TX packets 8 bytes 560 (560.0 B)
TX errors 0 dropped 0 overruns 0 carrier 0 collisions 0

xs4all-ipv6: flags=209 mtu 1472
inet6 fe80::53a0:9198 prefixlen 128 scopeid 0x20 inet6 2001:888:10:590::2 prefixlen 64 scopeid 0x0
sit txqueuelen 0 (IPv6-in-IPv4)
RX packets 0 bytes 0 (0.0 B)
RX errors 0 dropped 0 overruns 0 frame 0
TX packets 0 bytes 0 (0.0 B)
TX errors 0 dropped 0 overruns 0 carrier 0 collisions 0

[root@rpi-server andre]# ping6 google.com
PING google.com(wi-in-x64.1e100.net) 56 data bytes
From tunnel1424.ipv6.xs4all.nl icmp_seq=1 Destination unreachable: Address unreachable
From tunnel1424.ipv6.xs4all.nl icmp_seq=2 Destination unreachable: Address unreachable
From tunnel1424.ipv6.xs4all.nl icmp_seq=3 Destination unreachable: Address unreachable
From tunnel1424.ipv6.xs4all.nl icmp_seq=4 Destination unreachable: Address unreachable
From tunnel1424.ipv6.xs4all.nl icmp_seq=5 Destination unreachable: Address unreachable
^C
--- google.com ping statistics ---
5 packets transmitted, 0 received, +5 errors, 100% packet loss, time 4005ms

So.. what’s wrong here? The Sever is set as the exposed host, therefore it should receive the tunnel packets. So that can’t be the problem. Also, using the old initscripts script it works. So… I guess I’ll have to look at the the differences. At first glance they look the same, so the difference got to be in the details. (note: the error messages are due the fact my system is no longer having support scripts for the old style initscripts)

[root@rpi-server andre]# /etc/rc.d/6in4-tunnel start
/etc/rc.d/6in4-tunnel: line 13: /etc/rc.conf: No such file or directory
/etc/rc.d/6in4-tunnel: line 14: /etc/rc.d/functions: No such file or directory
/etc/rc.d/6in4-tunnel: line 18: stat_busy: command not found
/etc/rc.d/6in4-tunnel: line 36: add_daemon: command not found
/etc/rc.d/6in4-tunnel: line 37: stat_done: command not found
[root@rpi-server andre]# ping6 google.com
PING google.com(wi-in-x65.1e100.net) 56 data bytes
64 bytes from wi-in-x65.1e100.net: icmp_seq=1 ttl=56 time=23.8 ms
64 bytes from wi-in-x65.1e100.net: icmp_seq=2 ttl=56 time=23.0 ms
64 bytes from wi-in-x65.1e100.net: icmp_seq=3 ttl=56 time=23.4 ms
64 bytes from wi-in-x65.1e100.net: icmp_seq=4 ttl=56 time=26.4 ms
^C
--- google.com ping statistics ---
4 packets transmitted, 4 received, 0% packet loss, time 3004ms
rtt min/avg/max/mdev = 23.044/24.208/26.488/1.355 ms

The problem was rather stupid. A mistake I was struggling with last time I had to set this up. The “local” IP is supposed to LAN (internal) ip not my WAN (external) ip.

[root@rpi-server andre]# systemctl start xs4all-ipv6
[root@rpi-server andre]# ifconfig
eth0: flags=4163 mtu 1500
inet 192.168.178.49 netmask 255.255.255.0 broadcast 192.168.178.255
inet6 fe80::ba27:ebff:fe89:f248 prefixlen 64 scopeid 0x20 ether b8:27:eb:89:f2:48 txqueuelen 1000 (Ethernet)
RX packets 834 bytes 81976 (80.0 KiB)
RX errors 0 dropped 0 overruns 0 frame 0
TX packets 790 bytes 118486 (115.7 KiB)
TX errors 0 dropped 0 overruns 0 carrier 0 collisions 0

lo: flags=73 mtu 16436
inet 127.0.0.1 netmask 255.0.0.0
inet6 ::1 prefixlen 128 scopeid 0x10
loop txqueuelen 0 (Local Loopback)
RX packets 8 bytes 560 (560.0 B)
RX errors 0 dropped 0 overruns 0 frame 0
TX packets 8 bytes 560 (560.0 B)
TX errors 0 dropped 0 overruns 0 carrier 0 collisions 0

xs4all-ipv6: flags=209 mtu 1472
inet6 fe80::c0a8:b231 prefixlen 128 scopeid 0x20 inet6 2001:888:10:590::2 prefixlen 64 scopeid 0x0
sit txqueuelen 0 (IPv6-in-IPv4)
RX packets 0 bytes 0 (0.0 B)
RX errors 0 dropped 0 overruns 0 frame 0
TX packets 0 bytes 0 (0.0 B)
TX errors 0 dropped 0 overruns 0 carrier 0 collisions 0

[root@rpi-server andre]# ping6 google.com
PING google.com(wi-in-x71.1e100.net) 56 data bytes
64 bytes from wi-in-x71.1e100.net: icmp_seq=1 ttl=56 time=23.4 ms
64 bytes from wi-in-x71.1e100.net: icmp_seq=2 ttl=56 time=22.8 ms
^C
--- google.com ping statistics ---
2 packets transmitted, 2 received, 0% packet loss, time 1001ms
rtt min/avg/max/mdev = 22.897/23.150/23.403/0.253 ms

Now we got that working, the routing part. To configure the system as a IPv6 router, we add net.ipv6.conf.all.forwarding = 1 to /etc/sysctl.conf. Next we enable radvd. It appears I’ve already installed radvd, otherwise install it with pacman -S radvd.

The /etc/radvd.conf file contains tons of examples. So, we’ll have to a new file for this. We can use the XS4ALL auto create config file for this, as this is not distro specific. (ArchLinux isn’t on their list, they offer Debian, Redhat, FreeBSD, and some commercial Operating Systems like Mac OSX, Windows XP and Windows Vista)


interface eth0 {
AdvSendAdvert on;
AdvHomeAgentFlag off;

prefix 2001:888:1590::/64 {
AdvOnLink on;
AdvAutonomous on;
AdvRouterAddr off;
};
};

Looking at their config file, they’ve disabled Mobile IPv6 support (AdvHomeAgentFlag off;), which is an interesting feature of IPv6. I attended a presentation about this when I was in Sweden, back in 2008. I wish features like this would be widely implemented by now. I mean… if the mobile phone networks supported this…. Think about it. Just keeping your TCP connections open while switching networks. The technology is out there… and has been for years, but no dog uses it.

Anyhow…. back to the configuration. On the other machines, IPv6 connectivity is not yet working. It seems, the system is not acting as a router yet. It appears the /etc/sysctl.conf is not parsed, as when I run sysctl -p it starts working. Some more things that have changed since the old initscripts days. Looking at the ArchLinux Wiki, we’re supposed to create a config file in /etc/sysctl.d/, and if we click the link on there, we see the file needs extension .conf, so, let’s create this file, reboot, and see if it just works.

[root@rpi-server sysctl.d]# echo net.ipv6.conf.all.forwarding = 1 > ipv6_router.conf

Unfortunately, after reboot, it’s still not working…

[andre@rpi-server sysctl.d]$ sysctl net.ipv6.conf.all.forwarding
net.ipv6.conf.all.forwarding = 0

Getting this to work is always a pain in the ass. And why isn’t it parsing the damn config files…. grrr, they are where they should be. Sysctl seem to be started, so it should parse the damn config file.

andre@rpi-server ~]$ systemctl status systemd-sysctl
systemd-sysctl.service - Apply Kernel Variables
Loaded: loaded (/usr/lib/systemd/system/systemd-sysctl.service; static)
Active: active (exited) since Thu, 1970-01-01 01:00:02 BST; 43 years and 0 months ago
Docs: man:systemd-sysctl.service(8)
man:sysctl.d(5)
Process: 49 ExecStart=/usr/lib/systemd/systemd-sysctl (code=exited, status=0/SUCCESS)
CGroup: name=systemd:/system/systemd-sysctl.service

Please note it says 1970 as the Raspberry Pi doesn’t have a RTC, and this is executing early in the boot process (btw. I’ve ordered a I²C RTC to solve this problem)

Some more searching on the internet gave me some french blog. My french is very rusty, and when I had french class in high school, I totally sucked at is, so I won’t even try to read it, and just to the command to restart. After this the config file seems to be parsed. (Does it cache it or what?)

[root@rpi-server sysctl.d]# systemctl restart systemd-sysctl.service
[root@rpi-server sysctl.d]# sysctl net.ipv6.conf.all.forwarding
net.ipv6.conf.all.forwarding = 1

Let’s reboot. After reboot it is not set. So, even though systemctl says it got an active status, somehow, it is not. I’m tired of this, I will just hack it in. Adding systemctl restart systemd-sysctl.service to my tunnel script…. no change. trying sysctl net.ipv6.conf.all.forwarding=1 No change either. Ok. it seems systemctl config files require full paths. Now the hack works. So, the /usr/lib/systemd/system/xs4all-ipv6.service ended up looking like:


[Unit]
Description=XS4ALL IPv6 tunnel
After=network.target

[Service]
Type=oneshot
RemainAfterExit=yes
ExecStart=/sbin/ip tunnel add xs4all-ipv6 mode sit remote 194.109.5.241 local 192.168.178.49 ttl 255
ExecStart=/sbin/ip link set xs4all-ipv6 up mtu 1472
ExecStart=/sbin/ip addr add 2001:888:10:590::2/64 dev xs4all-ipv6
ExecStart=/sbin/ip -6 route add ::/0 dev xs4all-ipv6
ExecStart=/sbin/sysctl net.ipv6.conf.all.forwarding=1
ExecStop=/sbin/ip -6 route del ::/0 dev xs4all-ipv6
ExecStop=/sbin/ip link set xs4all-ipv6 down
ExecStop=/sbin/ip tunnel del xs4all-ipv6

[Install]
WantedBy=multi-user.target

Still, I would prefer to see the sysctl files parsed as it should. This is just a hack. So, I am not happy about this yet… however, the basic configuration is done now. I will have an image of the current content of the SD card (first 2 GB only) and then grow the file system to occupy the complete SD card.

Making the image of the card:

[root@hplaptop raspberrypi]# dd if=/dev/mmcblk0 of=rpi-server.img bs=1M count=1886
1886+0 records gelezen
1886+0 records geschreven
1977614336 bytes (2,0 GB) gekopieerd, 207,126 s, 9,5 MB/s

The original image was 1977614336 bytes, which is 1886 MiB. So, that’s the size of used part, before resizing. Please note, even though dd says MB and GB, it actually means MiB and GiB. I am creating this image in its original size, so I can write it to a different (size) SD card later if necessary.

Growing the file system I’ve already explained when I was discussing my other Pi.

At this stage, other stuff can be added to the installation. (And I should also take another look at qmeu userspace emulation) But also some server software meant for exposure to the internet, such as http, irc, and more. Thinking about my Media Center Project, perhaps the server Pi should run the tvheadend, and connect to the XBMC Pi over the network. It’s just… I am not that comfortable with running soft real time applications on a machine which can receive unknown load from the internet (and also my local network, but I have control over that)

Some more Pi

My second Raspberry Pi still powered on and connected to my LAN. That’s how I left to stack last Thursday. So, I SSH’ed into my first Pi, and from there, being inside my lan, I SSH’ed to my second Pi. Let’s do something with it, shall we? As this is a fresh installation, we have some configuration to be done. Let’s start with installing yaourt. On ArchLinuxARM we don’t need to add a repository like we should on regular ArchLinux.

[root@alarmpi ~]# pacman -S yaourt

As this Pi is connected to a screen, let’s get some graphical enviorement

[root@alarmpi ~]# pacman -S xorg xorg-apps xfce4 xfce4-goodies gdm

Note gdm seems to have some weird dependencies such as pulseaudio and flac. I assume because it makes some sound during login. I’ve tried lightdm instead but it doesn’t work on my Raspberry Pi.
Also base-devel is not installed, so we cannot compile anything, and the locale needs to be fixed, as I described in the other Pi installation, which I should also continue to write about. I have an unfinished post on concept for like…. ages. And I have a lot more to do on that other Pi… Anyhow, that’s all what I did last thursday, at least, to the Pi, as I went to the pub that night. It was 20 December after all, so, as the world was supposed to end the day after, it was my last chance to have some beers with friends.

So, 20 December 2012, I was at a pub until late at night. The result was I overslept the next day and missed the end of the world. And since I missed it, and was apparently still alive, I decided to continue playing around with that second Pi.

Since all the graphical stuff takes a lot of space, we should resize the file system to occupy the whole SD card. How to resize it is described on the ArchLinuxARM forum. It just tells you what to enter, but let’s take a look at what we’re actually doing


[root@alarmpi andre]# fdisk /dev/mmcblk0
Welcome to fdisk (util-linux 2.22.1).

Changes will remain in memory only, until you decide to write them.
Be careful before using the write command.

Command (m for help): d
Partition number (1-4): 2
Partition 2 is deleted

Command (m for help): n
Partition type:
p primary (1 primary, 0 extended, 3 free)
e extended
Select (default p): p
Partition number (1-4, default 2): 2
First sector (194560-31512575, default 194560):
Using default value 194560
Last sector, +sectors or +size{K,M,G} (194560-31512575, default 31512575):
Using default value 31512575
Partition 2 of type Linux and of size 15 GiB is set

Command (m for help): w
The partition table has been altered!

Calling ioctl() to re-read partition table.

WARNING: Re-reading the partition table failed with error 16: Device or resource busy.
The kernel still uses the old table. The new table will be used at
the next reboot or after you run partprobe(8) or kpartx(8)
Syncing disks.

We’re deleting the rootfs partition, and creating a new one. Since there is no space between the boot and the root partition in the first place, the new partition will start at the exact same position as the just deleted partition. This means, we’ve got a bigger partition, with a smaller filesystem in there.

We also observe the re-reading of the partition failed, since the partition is currently in use. Therefore we have to reboot in order for the new partition table to be known to the kernel. After reboot we can perform the resizing of the file system itself


[root@alarmpi andre]# resize2fs /dev/mmcblk0p2
resize2fs 1.42.6 (21-Sep-2012)
Filesystem at /dev/mmcblk0p2 is mounted on /; on-line resizing required
old_desc_blocks = 1, new_desc_blocks = 1
Performing an on-line resize of /dev/mmcblk0p2 to 3914752 (4k) blocks.
The filesystem on /dev/mmcblk0p2 is now 3914752 blocks long.

Now, we’re occupyting the whole SD card. So… setting up graphical enviorement. We’ve got some more disk space now, let’s install a browser.

[root@alarmpi andre]# pacman -S midori firefox
error: target not found: firefox

Hmmm…. firefox not found… apparently not in the repository. (Neither is thunderbird) More stuff I have to compile myself, just like I had to compile qemu. Perhaps I should really look into how to set up my own repository. For now, let’s install some other browsers.

[root@alarmpi andre]# pacman -S links midori netsurf

Links for when I am using a console. Perhaps I should better install elinks. Midori is a webkit browser. Should be fine for normal surfing but has some rough edges. At least last time I used it on my x86_64 machine. Netsurf, it is the default browser on the RISCOS image for the Raspberry Pi. That’s when I first heard of it.

Another this that cannot be missed on a graphical installation is an IRC client. Recently I have migrated from Xchat to Hexchat, since the latest Xchat release is over two years old. As Hexchat is in AUR, we need to compile it ourselves. While installing, I ran into the following error.

==> ERROR: hexchat is not available for the 'armv6h' architecture.
Note that many packages may need a line added to their PKGBUILD
such as arch=('armv6h').
==> ERROR: Makepkg was unable to build hexchat.
==> Restart building hexchat ? [y/N]
==> --------------------------------
==>

It happens on some packages. Note that AUR is meant for ArchLinux, and that ArchLinuxARM is just using their AUR. They could have set arch=(‘any’) and it would have compiled anyways, but i686 and x86_64 are the official supported architectures, therefore putting those in the arch array makes perfect sense. Just edit the PKGBUILD and add ‘armv6h’ to the arch array, and it will work fine. They should have used any. The specefic i686 and x86_64 should only be used for binary packages (skype, dropbox, opera and other proprietary someware *shiver*) or software written in assembly (not aware of any)

Compiling takes long, especially on an ARM board. Therefore, during compiling I decided to install some more software. Qmmp is the music player I usually use on my Linux boxes. I used to use xmms in the past, but it being a gtk1 application, it’s considered a dinosaur. Some distros ditched it years ago, but Arch still has it in its repository.

But doing this on a Raspberry Pi Model B Revision 1, with only 256 MB of shared RAM, well…. it ran out of RAM, and both terminals were closed. (My XFCE was running already) I need to connect a USB Hard Disk with a swap file and home partition. Compiling stuff on a SD card, it’s not a wise thing to do. Too many writes and a limited number of write cycles. I would like to use the SD for a little longer.

I know it’s not wise, but I’ve tried another attempt building hexchat, this time, not doing other things with the Pi during the build.

==> Tidying install...
-> Purging unwanted files...
-> Compressing man and info pages...
-> Stripping unneeded symbols from binaries and libraries...
-> Removing libtool files...
==> Creating package...
-> Generating .PKGINFO file...
-> Adding install file...
-> Compressing package...
bsdtar: Failed to set default locale
xz: (stdin): Cannot allocate memory
bsdtar: usr/share/locale/lv/: Write error
==> ERROR: Failed to create package file.
==> ERROR: Makepkg was unable to build hexchat.
==> Restart building hexchat ? [y/N]
==> --------------------------------
==>

So, it actually finished, but ran out of memory during the package creation. We really need that hard disk… But…. what hard disk to use? I have three external hard disks connected to my server Pi, but they’re in use. I have one more external HD. I wasn’t sure what was on it, but… there is stuff on it, and it’s full. A 500 GB Hard Disk… Backing the data up to my desktop… well… all it’s hard disks are smaller. One hard disk, containing a Windows 8 Developer Preview and an OpenIndiana installation, but mostly unpartitioned space. OpenIndiana isn’t really usefull on that machine, and I haven’t booted it since… long ago. And well… Windows… I don’t think I need to explain. So… that hard disk had been extracted from my desktop (blaatkonijn) and connected using a USB-IDE adaptor.

I’ve recently ordered an USB->IDE/SATA at dx.com. It looks exactly like my USB->IDE except for the SATA connector at the top. My USB->IDE power supply came with a switch in the cable, which the USB->IDE/SATA one lacked. More overly it came with a type B power plug.

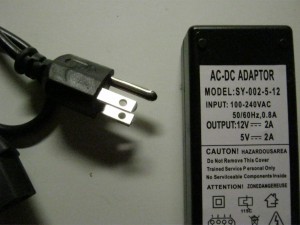
 

Even though it comes with a type B power plug, mostly used in the United Stated (120 VAC) and Japan (100VAC), the power adaptor says 100-240 VAC, so just connecting a different cable should do the trick. Still I was a little suspicious, as when inserting the power cable, it made this clack noise as if its initial current was rather high. Therefore I have verified the output voltages with a multimeter before connecting any hard disks to it. This is something I’ve done a few weeks ago.

Anyhow, I’ve decided to use that power adaptor, as I don’t need the switch, and I started to parition it. GParted refused to start, due incorrect locale. The locate problem, for now, I just did a export LC_ALL="C", but this was another problem that needed to be fixed. Well… GParted working on C locale. How big should I make the swap partition? I’ve made it 8 GB. It’s insane, but better too much then too little, and the rest of the disk as home partition.

As I am configuring my fstab anyways, let’s take care of my network mounts as well.

[root@alarmpi andre]# pacman -S nfs-utils

This results in the following entries added to my fstab


UUID=5d44c79b-7fc0-4711-a9f5-73dcaea98275 swap swap defaults 0 0
UUID=839de469-ef9d-48a7-aedd-d2a6b05f1a5f /home ext4 defaults 0 2

rpi-server:/srv/nfs4/1000 /mnt/1000 nfs defaults 0 0
rpi-server:/srv/nfs4/1500 /mnt/1500 nfs defaults 0 0

At first I put nfs4, but it didn’t work yet, so I am using nfs3 instead. Looking at my other machines, they’re also using nfs3, so that’s consitent with the rest of my installation. I should look at how to migrate to nfs4, but nfs3 is good enough for now.

Why did I mention that power adaptor? Well… it went poof and blew my fuse after operating for a while. At least, I blaim that thing for my blews fuse, as it was rather hot and smelled burnt, and I had a feeling about it since I got it. Hooray, I had a little mini tiny apocalypse, a blown fuse.

Connecting my other power supply, the one with the switch, which came with this USB->IDE adaptor, everything works fine. This power supply remains at a normal temperature, and has been running for quite a while without problems. However, now I don’t have any power supply for the other USB->IDE/SATA adaptor.

As this post is getting lengthy, this is where I stop. More will follow in a next post, as there are some more things I’ve encountered. I mean, a lot has happened while waiting for the world to end. Also, a package with a 5¼” floppy drive I’d bought on ebay arrived

Last friday, my CubieBoard arrived. I only had time today to play around with it. First of all, it turned out to be a 512 MB version. I was under the impression the CubieBoards from the Indiegogo campaign were the 1 GB version.

Anyhow, let’s get started. Since it is an Allwinner A10 based device, it *should* work as follows:
Prepare the SD card as for a Mele A100 and replace the script.bin file with the adequate version.
The script.bin file is a compiled fex file, using the fex2bin tool. It should be somewhere in that git repository as well, but there is an AUR package so just install sunxi-tools-git and there we go.

The package included an USB to 3.3 Volt serial cable. How to connect it however? A little looking around finds me the answer.

DSC_0002

Connected to the serial console… nothing!!! Nothing at all.

Now…. I have been stupid. I had another USB-to-Serial adaptor inserted to my compyter, connected to an (unpowered) BeagleBoard. No wonder I saw nothing
on the serial connection!

So… connected to the correct serial port, I see an u-boot prompt, the usual countdown till boot. And booting the kernel. However…. the kernel isn’t very happy about the board

The ArchLinux kernel is OOPSing… also, it detects 512 MB of RAM. This was supposed to be the 1 GB version of the CubieBoard, wasn’t it?
I have installed the script.bin for the 1 GB version. Perhaps that’s why it is having trouble? Replacing the script.bin file didn’t solve the issue.

I’ve downloaded a cubieboard specific boorloader/kernel from linux-sinxi which boots the board correctly. So, the board boots… however, using a kernel out of repository. I’m not that happy about having files in my filesystem pacman isn’t aware of.
Another issue with using this kernel is there are no kernel headers, so compiling kernel modules will be a problem as well.

So far so good, I’ve got a login prompt at the serial console. The system boots. Connecting the HDMI output to my DVI-D monitor doesn’t give me an output however. I will probably have to configure it somewhere. In the meantime, let’s look at some other stuff.

I’ve bought an HDMI -> VGA adaptor. Since my (second) Raspberry Pi is known to be working with my display, on it’s DVI-D input, I’ve decided to hook it up over VGA with the adaptor. This second Pi is not configured yet, just having (almost) unused image on it.

On boot, the monitor reports Out Of Range. This probably means the EDID information from the screen isn’t correctly passed through the HDMI interface, causing the Pi to select an unsupported resolution/refresh rate.

Of course it is possible to force a specific resolution in the config tile in the boot partition, but I consider this an ugly practice. So, software controlled resolution changing it is. It was a little work to figure this out, as it requires two separate tools to perform this action.

First there is fbset, a tool to configure the framebuffer. (Install package fbset)

Just setting

fbset -xres 1280 -yres 1024

doesn’t work. Therefore I have connected the monitor over DVI-D input again, and tried changing the resolution on a working screen. Even through the tool reports a different resolution, the content of the screen tells otherwise.

A little searching on the internet points me to a tool called tvservice. I have no idea to which package it belongs, it appears to be located in /opt/vc/bin. This directory is not in the path. It’s linked against libraries in /opt/vc/lib, which is also not in the library path. So, to tell ld to also look for libs there. (Note: temporary solution, also LD_LIBRARY_PATH was empty, otherwise I would have been replacing it with the command below)

export LD_LIBRARY_PATH=/opt/vc/lib

To list supported display modes

[root@alarmpi bin]# ./tvservice -m DMT
Group DMT has 8 modes:
mode 4: 640×480 @ 60Hz, progressive
mode 6: 640×480 @ 75Hz, progressive
mode 9: 800×600 @ 60Hz, progressive
mode 11: 800×600 @ 75Hz, progressive
mode 16: 1024×768 @ 60Hz, progressive
mode 18: 1024×768 @ 75Hz, progressive
mode 35: 1280×1024 @ 60Hz, progressive
mode 36: 1280×1024 @ 75Hz, progressive

To change resolution:

[root@alarmpi bin]# ./tvservice -e=”DMT 35″

This, indeed, does chnage the output resolution/refresh rate, however, it just outputs a blank screen. In order for it to work, afther changing the resolution with tvservice, the fbset command is required. Then it appears to work.

In the meantime, I have been thinking about other caused for this behaviour. I have heard about issues with similar adaptors in combination with the BeagleBoard. As the device is powered from the HDMI interface, it draws current from it. The current requirements were too high for the BeagleBoard, requiring a polyfuse to be replaced by a bigger one on the Beagle.

So, in order to test the device, I’ve hooked it up to the HDMI output of my laptop. The laptop (HP EliteBook 8530w) does not see the monitor connected. Not at all. At the moment when I unplugged the device, something funny happened.

Anyhow, seeing the results on the changing resolution on the Pi made me decide to give it another try. Surprisingly, this time it just worked out-of-the-box. I didn’t have to change any settings, the correct resolution was used right away.

I suspect the case was causing trouble again. There is this plastic case around my Pi, and the hole is just big enough for the metal part of the HDMI connector to pass through, however, the part where you hold the plug is against the cover, therefore, not allowing the plug go in as far as it normally would. This can cause some bad connection. Perhaps that’s what went wrong the first time. My usual HDMI->DVI-D cable has also bad contact issues, but it causes no signal.

This no-signal situation is what caused me to look into the online changing the output settings of the screen in the first place, as I don’t feel like rebooting until the damn plug makes contact.

However, I still have not verified the passing through of the EDID code. It could be that this tvservice is playing with me, and storing the resolution in the config file in the boot partition. It would not be neat if it did that, and I could just verify if the config file is untouched. Let’s assume for now, it just passed through the EDID as it should have.

Anyhow…. that was my Pi for today. I will have to look at the CubieBoard again, see how to make it generate some output on that screen. At least it boots, so it’s probably just a matter of configuration. And that’s going to be a little harder on the CubieBoard. The community is a lot smaller then the Raspberry Pi community, and AllWinner isn’t giving away much documentation about its SoC.

If it’s about documentation, a TI SoC is to be recommended I believe. I haven’t been reading much documentation myself, but that’s what I’ve been hearing. I still have that BeagleBoard C3 lying around. It’s that damn USB problem that’s keeping me from using it…. I should have returned it right away… I should… but back in the days I assumed it was a software issue and waited for a new kernel.

Well… the BeagleBoard, BeagleBoard-xM and BeagleBone are a little more expensive then Raspberry Pi and CubieBoard. I guess they’re also targeted at a different audience. Let’s just say, I’ve ordered a Raspberry Pi in the UK, I’ve ordered a CubieBoard in China, and a BeagleBoard in the USA. For the BeagleBoard I had to send a verification about the intended use to the American customs. Seriously!

P.S. Another funny observation: When unplugging the CubieBoard from its power source while connected to the supplied USB to serial cable, the power led remains lit (dimmed, but still emitting light)

There are no compilers installed on the system yet, so let’s do something about it, right? I mean, what is a Linux machine without compilers?

[andre@rpi-server ~]$ yaourt -S base-devel

I once wrote about dropbox, and tried to get it working on my BeagleBoard. Now, dropbox is proprietary software. I hate proprietary software you know. Actually, why would I trust some binary blob running on my system. It might be doing god knows what. Not showing your source? What are you trying to hide? Anyhow, the problem is the fact dropbox is only available as binaries, compiled for either x86 or x86_64, and we are on a armv6h system. So, we got to emulate x86 (or x86_64). For this purpose I suggest qemu, which is able to run linux elf binaries compiled for other systems, provided the required libraries are available.

My last attempt on my BeagleBoard wasn’t really successful, but that might be due the fact I didn’t have a full base system for the emulated architecture. With the new ArchLinux installation method, basically creating a base system using the pacstrap program, I should be able to setup a working system.

Now, the next problem is, qemu is not in the ArchLinuxARM repository

[andre@rpi-server ~]$ yaourt -Ss qemu
extra/vde2 2.3.2-2
Virtual Distributed Ethernet for emulators like qemu
community/libvirt 1.0.0-3
API for controlling virtualization engines
(openvz,kvm,qemu,virtualbox,xen,etc)
The URL http://aur.archlinux.org/rpc.php?type=search&arg=qemu returned error : 301

Looking at the last line, it appears the request to search the AUR is failing. However, 301 is not an http error code, but a redirect. The aur repository should be accessed through https and not http. We can fix this by setting AURURL="https://aur.archlinux.org" in /etc/yaourtrc

[andre@rpi-server ~]$ yaourt -Ss qemu
extra/vde2 2.3.2-2
Virtual Distributed Ethernet for emulators like qemu
community/libvirt 1.0.0-3
API for controlling virtualization engines
(openvz,kvm,qemu,virtualbox,xen,etc)
aur/aqemu 0.8.2-2 (0)
QEMU GUI written in Qt4

Now, we got results from AUR as well… but still no qemu. Last time I just grabbed the source from the qemu site and compiled that, but this time, I am going to build a package and install it through pacman.

Well, if there is no binary package, perhaps we can go through ABS (Arch Build System) and build the package ourself. So let’s look up how it works, shall we?

[andre@rpi-server ~]$ man yaourt
man: can’t set the locale; make sure $LC_* and $LANG are correct

Hmmm? what’s that? can’t set the locale?

[andre@rpi-server ~]$ locale
locale: Cannot set LC_CTYPE to default locale: No such file or directory
locale: Cannot set LC_MESSAGES to default locale: No such file or directory
locale: Cannot set LC_ALL to default locale: No such file or directory
LANG=en_US.UTF-8
LC_CTYPE=”en_US.UTF-8″
LC_NUMERIC=”en_US.UTF-8″
LC_TIME=”en_US.UTF-8″
LC_COLLATE=C
LC_MONETARY=”en_US.UTF-8″
LC_MESSAGES=”en_US.UTF-8″
LC_PAPER=”en_US.UTF-8″
LC_NAME=”en_US.UTF-8″
LC_ADDRESS=”en_US.UTF-8″
LC_TELEPHONE=”en_US.UTF-8″
LC_MEASUREMENT=”en_US.UTF-8″
LC_IDENTIFICATION=”en_US.UTF-8″
LC_ALL=

No such file or directory? We’re missing something here! It seems, in the rootfs image for Raspberry Pi, the locate isn’t set up
correctly. In /etc/locate.conf the language was set to LANG=en_US.UTF-8, however, it was never generated, since /etc/locale.gen isn’t configured, all
possible langauges were still commened out. Removing the comments for en_US.UTF-8 UTF-8 and nl_NL.UTF-8 UTF-8 and running locale-gen

[root@rpi-server andre]# locale-gen
Generating locales…
en_US.UTF-8… done
nl_NL.UTF-8… done
Generation complete.

Problem solved! Right, were where we, yes, compiling from ABS. Seems adding a

[andre@rpi-server ~]$ yaourt -Sb qemu

Gives me a not found too, so using ABS directly isn’t going to work either. So, what we’re going to do is get the PKGBUILD from the regular ArchLinux repository and build that.

[andre@rpi-server ~]$ wget http://mirrors3.kernel.org/archlinux/sources/packages/qemu-1.2.0-1.src.tar.gz

[andre@rpi-server ~]$ tar -xvf ./qemu-1.2.0-1.src.tar.gz

Edit the BUILDPKG file and add armv6h to the arch= array, (alternatively call makepkg with the -A option to ignore the architecture) and start buildpkg

[andre@rpi-server qemu]$ makepkg
==> Making package: qemu 1.2.0-1 (Tue Nov 20 21:01:34 GMT 2012)
==> Checking runtime dependencies…
==> Missing Dependencies:
-> sdl
-> alsa-lib
-> nss
-> bluez
-> vde2
-> libpulse
-> seabios
-> libcap-ng
==> Checking buildtime dependencies…
==> Missing Dependencies:
-> texi2html
==> ERROR: Could not resolve all dependencies.

Okay, missing some dependencies. If we were running through yaourt, it would install the missing dependencies for me. But let’s just install what it tells me to install.

[andre@rpi-server qemu]$ yaourt -S texi2html sdl alsa-lib nss bluez vde2 libpulse seabios libcap-ng

error: target not found: seabios

We discover seabios is not in the ArchLinuxARM repository either. However this is a noarch package, so we can just take it from the regular ArchLinux repository.

[andre@rpi-server qemu]$ yaourt -U http://mirrors3.kernel.org/archlinux/extra/os/x86_64/seabios-1.7.0-1-any.pkg.tar.xz

Now, we’re ready to build. Since this may take a while… let’s run it in a screen. Since this was a new installation, screen was not yet installed

[andre@rpi-server qemu]$ yaourt -S screen

and here we go!

[andre@rpi-server qemu]$ makepkg
==> Making package: qemu 1.2.0-1 (Tue Nov 20 21:35:20 GMT 2012)
==> Checking runtime dependencies…
==> Checking buildtime dependencies…
==> Retrieving Sources…
-> Found qemu-1.2.0.tar.bz2
-> Found 65-kvm.rules
==> Validating source files with md5sums…
qemu-1.2.0.tar.bz2 … Passed
65-kvm.rules … Passed
==> Extracting Sources…
-> Extracting qemu-1.2.0.tar.bz2 with bsdtar
==> Removing existing pkg/ directory…
==> Starting build()…

Since this is going to take for a while, just detach the screen, and tomorrow we’ll see if it worked

Something I might want to look into is cross-compiling, and not just compiling, but also to build the package. makepkg doesn’t appear to have an option for target architecture. Well, only in it’s configuration file, but as it doesn’t appear to have support for cross compiling by itself, I doubt if it will work if I just change the main config file.

I have been searching the ArchLinux wiki for cross compiling packages, without any luck yet. Perhaps I will find something on the ArchLinuxARM wiki, but not today. PS. I might consider setting up a repo for hosting qemu packages, but I need to collect more info what’s involved in doing so.

Now, updating my desktop and laptop’s configuration to mount the Raspberry Pi. On my desktop this didn’t cause any problems, however on my laptop it caused the following proglem:

$ mount /mnt/rpisrv
mount.nfs: rpc.statd is not running but is required for remote locking.
mount.nfs: Either use ‘-o nolock’ to keep locks local, or start statd.
mount.nfs: an incorrect mount option was specified

The troubleshooting on the Arch Wiki says to change the NFS configuration not to need statd. But what about doing exactly what the message tells me to do?

root@hp # systemctl start rpc-statd.service

So, now it works, so enable it on boot:

root@hp # systemctl enable rpc-statd.service

So far my other machines, back to the Pi. CUPS, yes, let’s get that printer working. Apart from the problems with the actual printer, the drivers can cause problems as well. I have written about this before, reported a bug, it was once solved, but later was re-introduced I believe.

# pacman -S hplip cups

to install CUPS and the hplip driver (and its dependencies, which used to cause the mentioned problems before)

# systemctl start cups

is not enough, I cannot connect to the CUPS on my Raspberry. Looking the the config file, it appears to be configured to listen on localhost only, which is off course rather useless for a headless server. In /etc/cups/cupsd.conf, replacing Listen localhost:631 by Listen 631 should fix this problem, but it does not. Looking at the log files

E [17/Nov/2012:19:59:20 +0000] Unable to communicate with avahi-daemon: Daemon not running

it turns out there is a dependency on another daemon which should be started first. Now, the server is listening, but it gives me a 403.
I still need to set from which IP addresses the connections are allowed (in the same file as mentioned above). Adding Allow from 192.168.178.*
to all access levels will do. IPv6 configuration will be done later.

The Unable to get list of printer drivers: Success error appears again. meaning I cannot use the hplip driver due the foomatic problem.
Removing that shit again

# pacman -R foomatic-db foomatic-db-engine foomatic-filters hplip

and installing gutenprint instead

# pacman -S gutenprint

This is a problem which has been around for months if not longer. It had been fixed at some point I believe, but it re-appeared at some point.

Using the gutenprint drivers, I can add the printer, but there is still a problem. The printer doesn’t appear automatically in the list at the other computers. I can add the printer manually, and then it works, so I suppose this is a problem with avahi.

And it was indeed an avahi problem. But it was on the client side, where the

# systemctl start avahi-daemon
# systemctl enable avahi-daemon

The printer still doesn’t magically appear in the list, however, when I access cups, it will report the printer found, and can be added manually. But when I try to print to it, I get the error "Unable to locate printer "rpi-server.local". According to this page, it means incorrect hostname or ip address. Which can be correct, as .local isn’t valid in my configuration. My modem is a Fritz!Box, and appends local hostnames by fritz.box. I suppose this should to into the avahi config file. Changing that doesn’t help. Now the printer isn’t appearing anywhere. I suppose I should change this part in the avahi configuration on all machines. If that’s the case then it totally breaks the point of avahi, automatic configuration.

Anyhow, I have been trying various things, but it appears I cannot get auto, or semi-automatic configuration working. I assume this is related to the switch to systemd, as from memory, it used to work automatically, as soon as the “share this printer” checkbox was marked, the printer used to automatically appear on all computers in the network. Well… I can add it manually. I guess that’s what I will do for now…. but I am not pleased with the fact it ain’t working as it should.

So, now I have ran fsck -f on all usb hard disks, just to be sure the file systems are not corrupted. I am aware there is probably some corrupt data on those disks, due the unstable USB bus on the BeagleBoard.

Well… plug everything in and boot up the system. The Raspberry Pi has two USB ports. I am currently using only one of them. I have connected a 4 port powered USB hub, to which I have connected the three hard disks, and another, bus powered, 4 port hub. To this hub I have connected my printer (HP Deskjet 895Cxi). This printer used to cause the BeagleBoard to crash all the time. It’s from the early USB-era, and therefore it might be not fully USB-complaint. However, I hope it won’t cause any problems on the Raspberry Pi. (I will have to repair my HP Deskjet 3320, but that’s another topic)

So… we got to configure the mount points. As I said, this will be done using their UUIDs. To see them, use the command blkid

# blkid
/dev/mmcblk0: PTTYPE=”dos”
/dev/mmcblk0p1: SEC_TYPE=”msdos” UUID=”A697-C157″ TYPE=”vfat”
/dev/mmcblk0p2: UUID=”f9e11351-e87a-4df2-a9be-27f03d215329″ TYPE=”ext4″
/dev/sda1: LABEL=”Extern1000″ UUID=”74afebc6-5b3f-4306-82dc-b164f4185aa3″ TYPE=”ext4″
/dev/sdb1: UUID=”577e2053-b83e-45d3-bad6-355475d07c36″ TYPE=”ext4″
/dev/sdb2: UUID=”effa82e7-ccc6-4d27-98d1-1aa255a702f3″ TYPE=”swap”
/dev/sdc1: LABEL=”Extern1500″ UUID=”30a34cab-aaf9-4c75-b63b-4e196cf8ef66″ TYPE=”ext4″

This translates to the following lines in /etc/fstab

UUID=74afebc6-5b3f-4306-82dc-b164f4185aa3 /mnt/1000 ext4 defaults 0 2
UUID=30a34cab-aaf9-4c75-b63b-4e196cf8ef66 /mnt/1500 ext4 defaults 0 2
UUID=577e2053-b83e-45d3-bad6-355475d07c36 /home ext4 defaults 0 2
UUID=effa82e7-ccc6-4d27-98d1-1aa255a702f3 swap swap defaults 0 0

However, looking at the already present lines, I am not sure if I am completely happy with them.

devpts /dev/pts devpts defaults 0 0
shm /dev/shm tmpfs nodev,nosuid 0 0
/dev/mmcblk0p1 /boot vfat defaults 0 0

Seeing the root file system is not present, and the boot file system has last parameter 0, meaning, the content of the SD card will never be checked for errors. I don’t know if this is the desired behaviour. So, I will change it to:

UUID=f9e11351-e87a-4df2-a9be-27f03d215329 / ext4 defaults 0 1
/dev/mmcblk0p1 /boot vfat defaults 0 1

and reboot… after a while, the system comes up, looking at the output of the mount command, everything seems to be mounted as it should. However… looking at

/dev/root on / type ext4 (rw,relatime,user_xattr,barrier=1,data=ordered)

I wonder weather it is fsck’ed during boot…

Sooo, let’s see what still has to be done: make user accounts, install cups, perhaps sane, perhaps an http and sql server (as they ran on the BeagleBoard as well), transmission-deamon, and more.

Originally I intended to also run an IRC server on my BeagleBoard, but due instabilities I have stopped doing so. If this board is stable, I guess I will try again. Another project I started, which I now may continue a lot easier due the changed in ArchLinux is getting Dropbox to run. Now, it’s quite easy to generate a base system using pacstrap. As I believed not having a complete base system was the reason my previous attempt on the BeagleBoard failed.

However, I am forgetting one of the tasks the Raspberry Pi should take care about, my IPv6 tunnel. Since back when I configured my BeagleBoard, systemd has been introduced, but it appears the wiki hasn’t been updates, and still tells me to make the script and put it in the /etc/rc.conf file.