
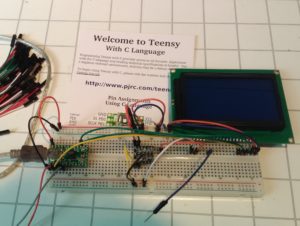
Quite a while ago, I believe it was back in January 2013, I ordered some Teensy microcontrollers. I ordered a Teensy 2.0, a Teensy++ 2.0 and a Teensy 3.0. Now, three and a half year, I finally started to play around with them. Yesterday I started with the Teensy 2.0. This is an Atmel ATMEGA32U4 micro controller.
The project, an idea that is almost as old as my microcontrollers, is basically a temperature logger. Log the temperature measured using a DS18B20 to an SD card. However, that’s the final goal. My first idea was to interface with an LCD screen. I’ve got a model 128×64 pixels, which appears to be ST7920 based. These can be addressed in parallel or serial mode.
 I’ve found a library to control LCD displays on microcontrollers: u8glib. This library has support for many LCD displays. So it would make switching to a different type of display as simple as changing one line of code, and everything works again.
However…. I didn’t get this thing to work. Basically, what I am trying to do is to compile the ATMEGA “Hello World” example. I have changed the Makefile to reflect that I am using an ATMEGA32U4, and added the initialisation code for a 128×64 pixel ST7920. However, nothing appeared on my screen.
I have tried to address both parallel and serial mode. Note that my display was hard wired to parallel mode using a solder bridge. Well, that’s easily fixed, but still nothing appears on the screen. There is a pot meter on the back to set the contrast, but spinning that thing around doesn’t help either.
Well… the purpose was getting some output. Next thing, the UART. I googled around and found a simple uart with avr libc. However, after adjusting the Makefile to reflect I am using an ATMEGA32U4, the thing doesn’t compile. It seems, the ATMEGA32U4 only has an UART1 and no UART0. After changing the numbers, the code compiles just fine.
Now, trying the make upload fails. It turns out, the Teensy uses a bootloader not supported by avrdude. The Teensy comes preprogrammed with the HalfKay bootloader. The code is closed and proprietary. (Some info about bootloaders) For now, I use the flashing tool supplied by PJRC. A precompiled binary, which required me to install an old version of libpng.
Nevertheless, I can upload the compiled hex file to the microcontroller, and attach an USB TTL serial device. But at his point, all I got was mojibake. At least something shows up.  Well…. mojibake on a serial connection usually means the incorrect bitrate has been used. After tweaking around in the code, I got readable output when loading the program from the bootloader, but when I powercycled, the output was mojibake again.
What’s going on? I made incorrect assumptions on the CPU speed of this device. As the device specs say 16 MHz, I assumed it was running at 16 MHz. However, it turns out, the device is configured to boot at 2 MHz. This solved a lot of mysteries. This also made me check the LCD code, but the hello world example did configure the clock speed so it wouldn’t have suffered from incorrect timing due this fact.
So, after having established serial communication, the DS18B20 sensor is to be added. Please be carefull when wiring it up. The middle pin is the data pin, for sure, but the outer pins, when looking at the datasheet, it has bottom view, so it’s quite easy to make the mistake to swap them around. The thing gets HOT when you swap them, but it seems, the part survived it. A library to communicate with this sensor can be found here. I changed the connection setup in the header file and compiled the code. At first, I could only get a readout of a constant -0.063. In one of the comments someone mentioned clocking down to 1 MHz solves the problem, and indeed it does. So, this looks like some sort of timing bug. I suppose I don’t need 16 MHz for this project anyways, so, for the time being, let it run at 1 MHz. There are other modifications I would like to make to this library as well, such as support for multiple sensors on the bus.
 Next thing, adding an SD card. Now, one thing to keep in mind. SD cards require 3.3 Volt I/O. The Teensy 2.0 comes with a default configuration of 5 Volt. (The microcontroller can run at 3.3 Volt, but is speed limited to 8 MHz in that case). So, for the purpose of interfacing with an SD card, I use a level shifter. At this moment I don’t have a 3.3 Volt regulator I can solder to my board. Furthermore, I intend to interface with that LCD display I mentioned before, which requires 5 Volt I/O. Either way I would require such a level shifter.
So, looking around for SD support on ATMEL microcontrollers, by first hit was SdFat. However, this required the Arduino libraries and is written in C++. I don’t intent to use C++ on a microcontroller. On a microcontroller I want plain flat C. On a microcontroller speed and size are limited, so I wouldn’t want to write C++ code for a microcontroller. So, the search continues, and gives me sd-reader. This implementation looks better suited for my purposes. However, it has no support for the specific microcontroller I have. First of all, the mentioned UART1 in stead of UART0, and probably some other register changes. There is a patch available against an old version of this code. I suppose I should analyse the changes and apply them to the latest code. However, with the patch, the example code runs and is able to read and write to my SD card.
« Kodi on BananaPi (part 2) Teensy 2.0, the adventures continue »